Configuration and adjustment of a table saw are critical for ensuring both safe operation and precise, clear cuts. An appropriately configured saw will operate without jerks, require minimal effort to operate, and deliver years of dependable service. In this article we talk about How to Set Up and Tuning Your Table Saw step by step Guide.
Choose a Stable Region
Establishing an optimal operating position for the saw constitutes the initial stage. As it should be:
On an even, level, and flat surface. – When making incisions, the saw might shake and sway due to any irregularity. This may lead to hazardous lacerations and additional complications.
Moisture should be avoided at all costs, as an accumulation of it will eventually cause the trunnions and saw table to corrode. This negatively impacts the efficiency of operations.
Convenient proximity to a material storage area—Owing to the ease of access to the stock pile, transporting timber to the saw requires less effort.
In an adequately illuminated area—Precise visibility during the measurement process guarantees precision and averts inaccuracies.
An orderly and sufficiently capacious workstation diminishes the likelihood of tripping and falls that may occur during its operation.
Construct the stand and mount the saw.
Ensure that all components, including the base and stand, included with your table saw are assembled precisely as directed by the manufacturer. Ensure that each fastener and nut is fastened securely. Employ thread separators when instructed to do so.
With care, affix the saw to the stand, ensuring that it remains stable and devoid of any vibrations. There may be instances where contractor saws must be bolted directly to the shop floor. If so, select a level surface and, if necessary, position shims below the base of the saw.
Install Blades and Conduct Static Inspections
Ensure the teeth of the 10-inch carbide-tipped blade are facing forward at the front edge of the table before affixing it to the blade guard assembly. Observe any movement or wobble in the blade and make the necessary adjustments to the height and angle. It is ideal for the arbour and trunnions to exhibit minimal vertical and lateral displacement. Tighten the trunnion bolts if excessive movement is observed; if the product is still under warranty, contact the manufacturer.
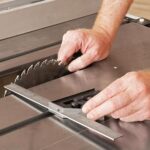
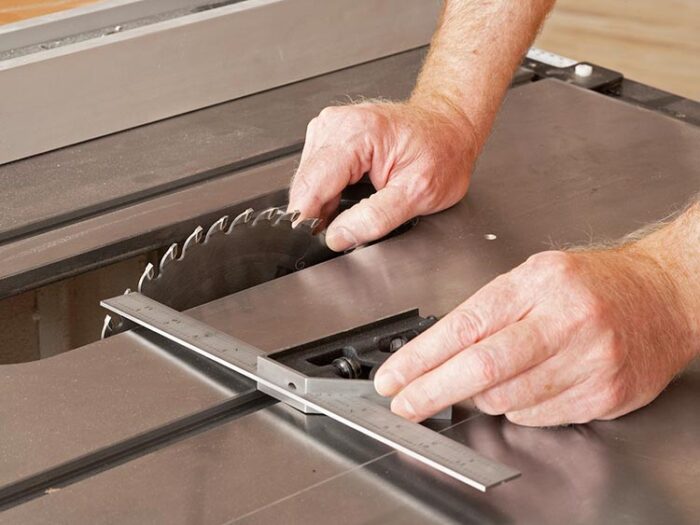
Blade-to-Fence Alignment
In order to achieve incisions that are accurate, linear, and free from kickbacks, this stage is critical. Unplug the saw and turn the blade by hand to determine whether it encounters resistance or the fence while progressing from front to back. By comparing the fence and blade with a combination square, one can identify any misalignment. In order to achieve accurate parallel alignment while accounting for blade kerf, slightly orient the fence in the direction of the blade. Upon completion, secure the barricade.
Adjust the height and tilt limits of the blades.
In the case of certain operations, such as bevel and non-through cuts, these adjustable mechanical limits permit the blade to be raised or lowered to a predetermined degree. For appropriate setting:
Raise the blade to the maximum permissible cutting height.
- In order to establish motion with the trunnion bracket, lower the stop collar and relax the height stop fastener.
- Apply pressure to the bolt while observing whether the stop obstructs the blade’s path towards its intended destination.
In order to establish the bevel stops at 45 and 90 degrees, incline the blade completely to the side and firmly press the corresponding stop collar against the trunnion housing.
Implement Test Cuts
At this moment, activate your table saw and perform a few test cuts to validate your configuration. To begin, cut a spare 2×4 lumbar piece with a tear. Examine the stock for binding, burning, clean fence contact, and blade wobbling. Ensure that the dimensions of the board align with the specific configuration of your fence.
Next, make a cross-cut on the same board using your mitre gauge to ensure that it is perpendicular to another torn 2×4 piece. Small, progressive adjustments must be made to the fence and mitre gauge in order to achieve precise cuts at 90 and 45 degrees. By performing these test cuts, your table saw is calibrated for routine use.
Install safety accessories.
For the secure operation of a table saw, safety attachments including push sticks, featherboards, splitters, and anti-kickback pawls are required. Proceed with the installation as outlined below:
Pawels with a separator and a reverse kickback
Align their edges precisely with the gullets on the left side of the blade to facilitate stock passage and prevent material entanglement. Confirm that the pawns can be easily reversed and positioned in the neutral position without becoming stuck.
The Rivalry Blade
Current saws substitute the splitter with the riving tool, which should be positioned three to five millimetres posterior to the gullets in the blade. Bear in mind that its height must be adjusted to accommodate variations in blade height.
Armed Guards
Ascertain that the blade guard assembly, constructed from see-through plastic or mesh, fits snugly onto the splitter and encloses the blade exposure zone entirely when cutting. It ought to be capable of rising and falling readily when the blade height is modified.
Supplementary Safety Attachments
Finally, ensure that safety equipment such as push poles, push blocks, featherboards, and other similar tools are easily accessible.
Finalise the remaining safety inspections.
Complete the table saw configuration once the following safety checks have been validated:
The saw is functioning as intended, with the following safety features present: activated dust collector and blade guard, accessible push stick and blocks from work zones, parallel-locking fence with blade protection, non-slip surroundings, prepared safety accessories including eye protection, and in good condition power cord and ON/OFF switch.
Following the most recent inspections, your table saw has been fully adjusted and calibrated to operate with precision, safety, and seamlessness.
Routine Maintenance of Table Saws
Perform the following routine maintenance on your table saw to ensure that it continues to operate at optimal efficiency for many years:
Halter fasteners, brackets, stops, and arbour bolts should be inspected and adjusted.
– Consistently inspect and modify the parallelism of the blade to the mitre slots.
– Completely clean the pitch, saw top, and fence rails.
– Confirm the alignment of the splitter and pawl.
– Conduct a visual inspection of the insulation surrounding the power cable and the ON/OFF button.
– Consistently clean the enclosed base and undersaw top.
– Verify for corrosion the trunnion brackets and wheels.
Lubricate the lead screws and trunnions with a light oil.
Achieving optimal cutting safety and precision can be accomplished through the implementation of appropriate table saw setup, calibration, and maintenance procedures. Follow these detailed instructions to optimise the performance of your saw. I sincerely hope you find this “How to Set Up and Tuning Your Table Saw step by step Guide” article helpful.