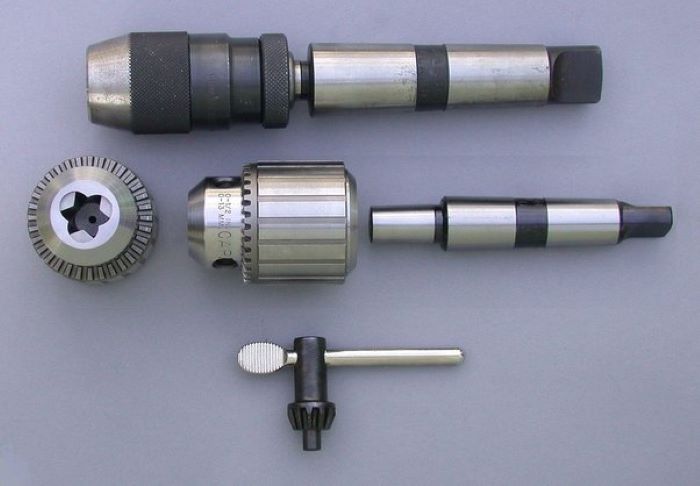
We all know the importance of owning the Drill Press in our home or machine shop. Using the drill press, we can easily make holes through the various workpieces. Today we will discuss about How To Repair, Remove, And Reinstall A Drill Press Chuck for letting you know the disassembly of the drill press chuck as well as the cleaning procedure in brief.
The main reason to clean the chuck is to prevent the formation of rust and reducing the possibility of corrosion. Such kind of problems make the operation of the chuck difficult and also reduces its life. Hence, we must be extremely careful while cleaning it and we must clean it on regular basis.
Why do you require to replace the chuck?

You might be wondering that why there is a requirement of frequently replacing the Drill Chuck. Well, the main reason is that we require different kinds of chuck for carrying out a variety of operations. Or else, if we use the chuck frequently then it might get worn out. A chuck that is worn out isn’t capable of holding the drill bit in a proper manner, due to this also we also require replacing the chuck.
Also, for carrying out the cleaning procedure of the drill press chuck we need to replace the chuck. Because of all such kind of reasons, there is a requirement of replacing the chuck at some interval of time.
How To Remove And Clean A Drill Press Chuck?
Removing the Drill Press Chuck from the drill press is quite a simple task. There are two kinds of drill press available in the market. Due to this, their removal process also differs from one another.
These two methods are namely, Removal with the Chuck Key Method and Removal with the Wooden Piece Method. Both these methods accomplish the same task that is to remove the taper shaft from the drill press and loosening the bolt. Kindly go through these methods given below.
>> Removal with the Chuck Key Method
With the help of this method, we will be able to remove the chuck only from the kind of Drill Press that is having a chuck key in its setup.
First of all, we have to bring down the chuck at the least height possible. All we have to do is just pulling down the handle of the drill in the downward direction and it will come down.
Next, we have to rotate the quill lock. We have to hold the chuck at the same position without any kind of disturbance. While rotating the quill, you will locate a vertical slot. You have to put the chuck key in that slot.
After putting it in the slot, you have to apply a little amount of force on the mallet. This force will unmount the drill chuck from the drill press.
>> Removal with the Wooden Piece Method
In case the drill press isn’t having a space for accommodating the Chuck Key, we can use the Wooden Piece Removal Method.
For effectively carrying out this method, first of all, we have to keep the wooden piece on the above of the chuck. It should be facing the downward direction.
Next, we have to apply force on the wooden piece with the help of the hammer. Once the proper kind of stroke is made, the chuck will come down with an ease.
Read | Why you need a Drill Press Machine?
However, we have to make it sure that the wooden piece that we are using is of sufficient length and can bear the strokes to the greater extent.
Why is it necessary to Repair the Chuck?
After determining the method of How To Remove And Clean A Drill Press Chuck, we should also know that why it is necessary for us to clean the drill press chuck. Here in this section of our article, we will let you know about the main reasons for the same.
- With the continuous friction on the chuck, while it is rotating for making the holes in the workpiece, it undergoes a lot of stress. Due to such kind of stress, its boundaries get worn out and can’t accommodate drill bit in a proper manner. In such case, we require removing the chuck.
- Moreover, while cutting the workpiece, the sawdust, scrap materials as well as dust particles enter into the system of the drill press. For removing them, it is necessary for us to clean the chuck.
- While the chuck is rotating, it faces a lot of wear and tear. This reduces its productivity to a great level. Hence, for enhancing its productivity, we have to replace the chuck.
How To Remove And Clean A Drill Press Chuck – Safety Considerations to be kept in mind
There are some safety considerations that we have to keep in mind while dealing with the drill press chuck. Otherwise, we might meet some accident and cause injury to us or to the operator. Here are some of the safety tips that we have to follow:
- Before removing the chuck from the drill press, we have to remove the electricity supply first. This will prevent the unexpected running of the chuck in case of power leakage.
- After removing the chuck, we have to open its jaws.
- When starting with the cleaning, first of all, we have to take a piece of cloth and wipe off the dust particles from it. Whereas, for removing the dust particles within the chuck we can make the use of an air compressor. However, we require retracting the jaws of the chuck for accomplishing this procedure.
- Once you are done with it, we have to provide the necessary amount of lubrication. Lubrication will make the smoother running of the chuck possible.
- After lubrication, we have to move the jaw few times for making the oil or grease reach each and every corner of the chuck.
- Another important thing to keep in mind is to wear the safety glasses. The safety glasses prevent the entry of harmful particles in your eyes. Hence, for the safety of our eyes, there must be some protection with us.
How to reinstall Drill Press Chuck
After determining each and every aspect of How To Remove And Clean A Drill Press Chuck, we also need to know the method of reinstalling the chuck. So that we can use it again in the same manner. Here is a glimpse of the method for the same.
- First of all, we have to bring the quill till the maximum possible height. Once it reaches there, we have to tighten it till the maximum possible limit.
- After it, we require inserting the chuck in the provided slot and rotating it when done. Next, we have to tighten the jaws for fixing them firmly with the drill bit.
- Then, we have to move the chuck so as to check whether it is working properly or not. For checking it, we have to supply the drill press with an electrical connection. Just switch on the motor of the press and it will start running.
Summary
Here, we have given a brief overview of the cleaning procedure of the drill press chuck. Before starting with the cleaning procedure, we have to unmount it from the press. After it, using the above-given methods we have to clean it properly. In this way, we will be able to increase the life of the chuck to a greater extent.
We hope that out compilation will be helpful to you for finding the answers on How To Remove And Clean A Drill Press Chuck?


